


The concept of componentization has revolutionized website development, completely transforming how they are built. At the heart of this revolutionary shift is the introduction of Shadow DOM, a key component in this paradigm change. With Shadow DOM’s powerful method, developers can isolate styles, scripts, and markup within specific components. This encapsulation is a barrier, effectively shielding these components from the broader scope and avoiding accidental interference. The introduction of Shadow DOM marks a significant advancement in web development practices.
Developers may design modular and isolated components using Shadow DOM, guaranteeing their independence from the global scope. In addition to improving security, this separation makes maintenance easier and enables developers to concentrate on specific components without worrying about other variables interfering with their operation.
When it comes to automating elements within the Shadow DOM, it can be quite challenging compared to elements in the regular DOM. However, Cypress provides a solution for automating elements under the Shadow DOM.
In this blog, we will explore the complication of automating Shadow DOM in Cypress, a powerful end-to-end testing framework.
Don’t waste time decoding binary data manually. Try our Binary to Text Converter tool to convert binary data to text. No more tedious manual conversion needed!
What is a Document Object Model (DOM)?
The Document Object Model (DOM) is fundamentally a programming interface that web developers are given access to by browsers. It displays the document’s structure as a tree of objects, each representing a different aspect of the document, such as its components, attributes, and textual content. When it comes to web pages, developers can dynamically interact with them, altering their appearance and functionality in real-time. This is made possible by the hierarchical structure of web pages.
DOM serves as a fundamental interface for programs to dynamically manipulate the structure, style, and content of documents on the web. It empowers developers to create, read, update, and delete elements and attributes within a web page, enabling interactivity and dynamism. This dynamic capability of the DOM is crucial for crafting interactive web applications. By harnessing programming languages such as JavaScript, developers can access and modify the DOM, allowing them to build responsive and interactive web applications with unparalleled flexibility and power.
Document: The web page you see in your browser is a document. When a web page is loaded, the browser creates a DOM of the page.
Object: In the context of the DOM, an “Object” represents every element and component of a web page. These objects include paragraphs, headings, images, buttons, forms, etc. Each of these objects can be manipulated using code.
Model: The DOM represents the document so that programs can change its structure, style, and content while in the browser. It provides a way for programs to manipulate the structure, style, and content of web documents.
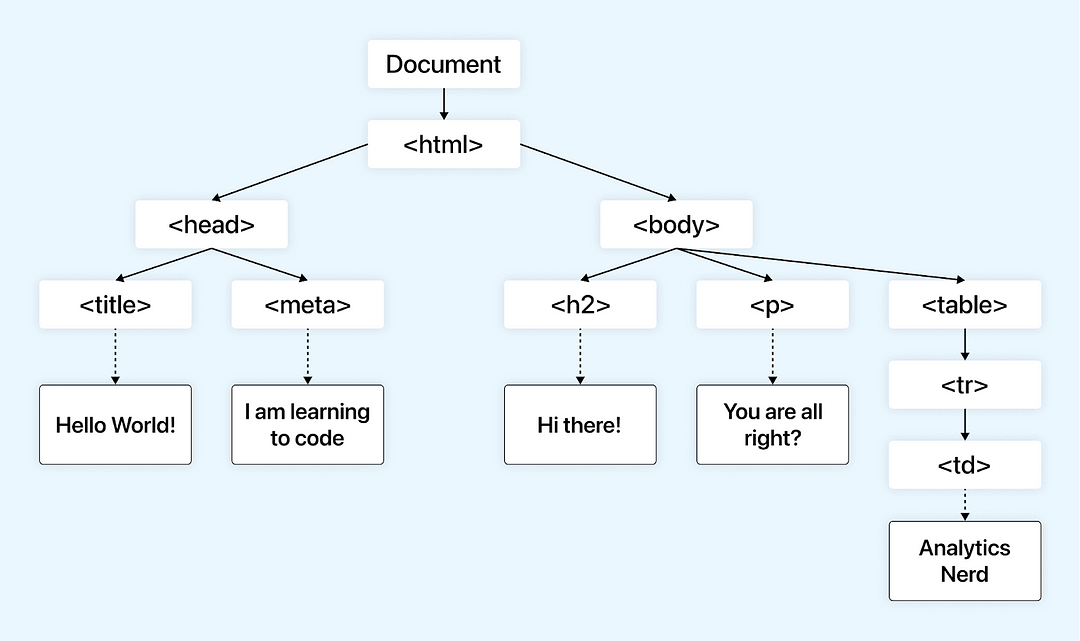
In the DOM, every branch within the tree structure leads to a node, which is a fundamental unit. These nodes are pivotal elements in the DOM, encapsulating various objects and data.
Each node represents a distinct document part, such as elements, attributes, and text content. This hierarchical arrangement allows web browsers to interpret and manipulate pages, enabling dynamic content and interactive user experiences.
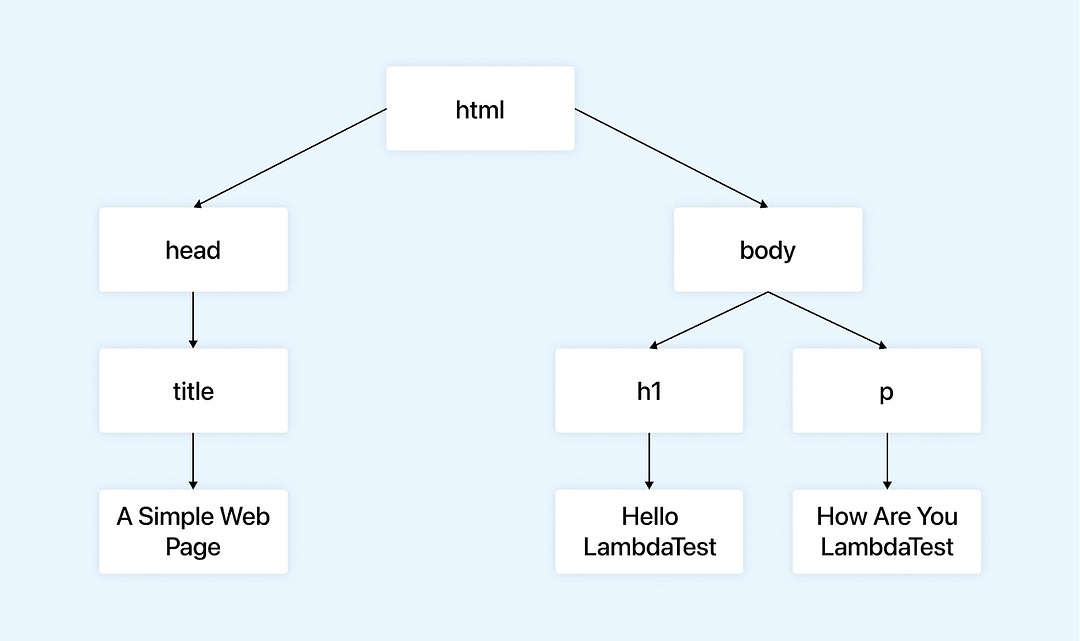
Let us take an example of an HTML page. In this example, the HTML document contains a head section with a title element, setting the page title to “A simple web page”. The body section contains a heading element (< h1 \>) with the text “Hello LambdaTest” and a paragraph element (< p >) with the text “How are you LambdaTest”. This HTML code would display a webpage with the specified content when rendered in a web browser.
<html lang=“en”>
   <head>
      <title>A simple web page</title>
   </head>
   <body>
      <h1>Hello LambdaTest</h1>
      <p>How are you LambdaTest</p>
   </body>
</html>
As mentioned above, a logical tree of this HTML structure would look like this.
Need to convert CSV to JSON? Try our free CSV to JSON converter tool to convert your CSV files to JSON format. Simple and easy to use. Try it now for free!
What is a Shadow DOM?
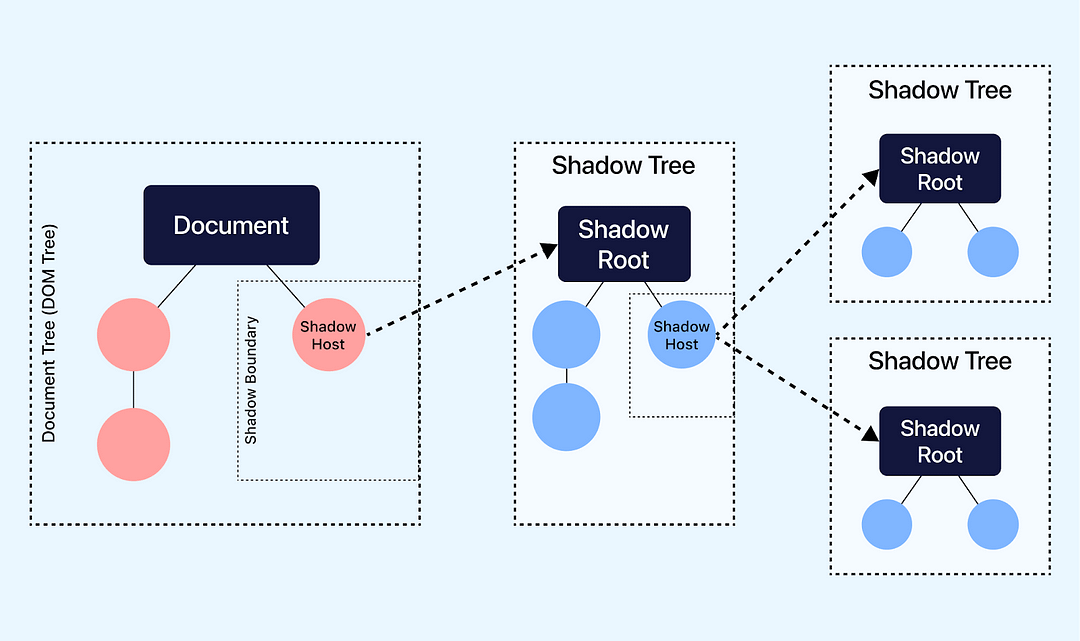
Shadow DOM stands for Shadow Document Object Model. It’s a web standard that offers a scoped subtree within a document, meaning that the DOM elements inside a Shadow DOM are hidden from the main document (& vice-versa). This encapsulation helps developers create widgets (or other components) with encapsulated styles and behaviors without worrying about conflicts with the styles or scripts of the main document (or other components).
It is particularly useful in web development when developers have to create isolated components with their styles and behavior, preventing conflicts with the styles and scripts of the main document or other components on the same page.
Shadow DOM enables the creation of multiple shadow trees alongside the standard document tree, representing the DOM structure of the entire project. Each tree possesses a root node, known as the shadow root, housing its unique elements and styling. These trees are linked to specific elements within the parent document tree or other shadow trees, with these connecting nodes referred to as shadow hosts. The demarcation line separating the regular DOM and the Shadow DOM is termed the shadow boundary.
Convert your JSON files to CSV format in seconds with our easy-to-use JSON to CSV Converter. It’s fast, reliable, and user-friendly, making data conversion simple.
Here are some of the key components of Shadow DOM:
- Shadow Host
The regular DOM element to which a Shadow DOM is attached is the Shadow Host. It’s the element where the Shadow DOM is attached, effectively encapsulating the elements inside it.
- Shadow Tree
Inside the Shadow DOM, there is a Shadow Tree. This tree comprises the encapsulated DOM elements and their associated styles and behavior.
- Shadow Root
The shadow root is the root node of the shadow tree. It is a gateway between the Shadow DOM and the main document’s DOM.
- Shadow Boundary
At this point, we transition from the Shadow DOM to the familiar territory of the regular DOM. Elements inside the Shadow DOM can’t be accessed or styled from outside the Shadow DOM unless specific mechanisms are provided.
Benefits of Shadow DOM
Shadow DOM offers several benefits in web development. Here are some key benefits:
- Encapsulation
Protects DOM and styles from outside styles and scripts, preventing conflict. It also prevents styles and scripts from the outer document from leaking into the components, causing unintended styles and behavior.
- Isolation
Gives styles and scripts limited scope, avoiding clashes with global styles and scripts, as globally applied CSS and JavaScript may cause name conflicts and unwanted side effects.
- Reusability
Enables the creation of self-contained, reusable components that can be safely inserted into other web application components without worrying about style inconsistencies.
- Simplified Styling
Makes style easier by letting you create CSS for a single component without worrying about how it will affect the rest of the document, as traditional styling might require complex selectors to avoid conflicts.
From SQL to JSON in a snap! Convert SQL queries to JSON effortlessly with our SQL to JSON converter, enhancing compatibility and data interchange. Try it now!
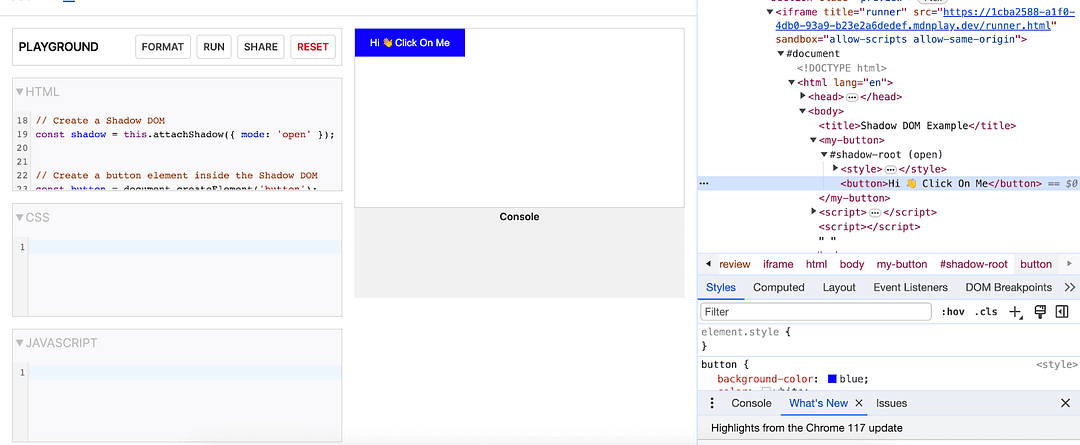
Let’s explore an example that demonstrates the process of attaching Shadow DOM to HTML and how it helps encapsulate the structure and styles of HTML.
Consider a simple example where you want to create a custom button component encapsulated within Shadow DOM:
In this example, we define a custom button component (< my-button >) that encapsulates its HTML structure and styles using Shadow DOM. The button’s appearance and behavior are isolated from the rest of the page, making it a self-contained component that can be used without interfering with the global CSS or JavaScript.
<!DOCTYPE html>
<html>
<head>
<title>Shadow DOM Example</title>
</head>
<body>
<my-button></my-button>
</body>
</html>


<script>
// Create a new custom element using the CustomElements API
class MyButton extends HTMLElement {
constructor() {
super();


// Create a Shadow DOM
const shadow = this.attachShadow({ mode: 'open' });


// Create a button element inside the Shadow DOM
const button = document.createElement('button');
button.textContent = 'Hi 👋 Click On Me';


// Add some styles to the Shadow DOM
const style = document.createElement('style');
style.textContent = `
button {
background-color: blue;
color: white;
padding: 10px 20px;
border: none;
cursor: pointer;
}
`;


// Attach the button and style to the Shadow DOM
shadow.appendChild(style);
shadow.appendChild(button);
}
}


// Define the custom element
customElements.define('my-button', MyButton);
</script>
Here’s a breakdown of the code:
The HTML document defines a < my-button > custom element inside the .
In the < script > block, a new custom element, MyButton is created by extending the HTMLElement class. The constructor of MyButton sets up the Shadow DOM and creates a button element inside it.
Inside the Shadow DOM, a button element is created and styled with a blue background, white text, padding, no border, and a pointer cursor.
The custom element is defined using customElements.define (‘ my-button ‘, MyButton);, associating the custom element tag name < my-button > with the MyButton class.
Get faster loading times and better user experience with our efficient JSON Stringify tool. Quickly compress your JSON data with ease and optimize your website now.
Output:
The ‘Hi 👋 Click On Me’ button is inside the Shadow DOM.
Before delving into how to handle Shadow DOM elements using Cypress, it’s crucial to understand how to access these elements. The upcoming explanation will illuminate these challenges and solutions for effective Shadow DOM element handling in Cypress.
How to Access Shadow DOM Elements?
Before discussing how we can handle Shadow DOM in Cypress, we must discuss what will happen if a user tries to access Shadow DOM elements without using the method that is provided by Cypress to handle these elements.
Let’s examine the consequences of attempting to directly access Shadow DOM in Cypress, with detailed examples below.
Use Case 1
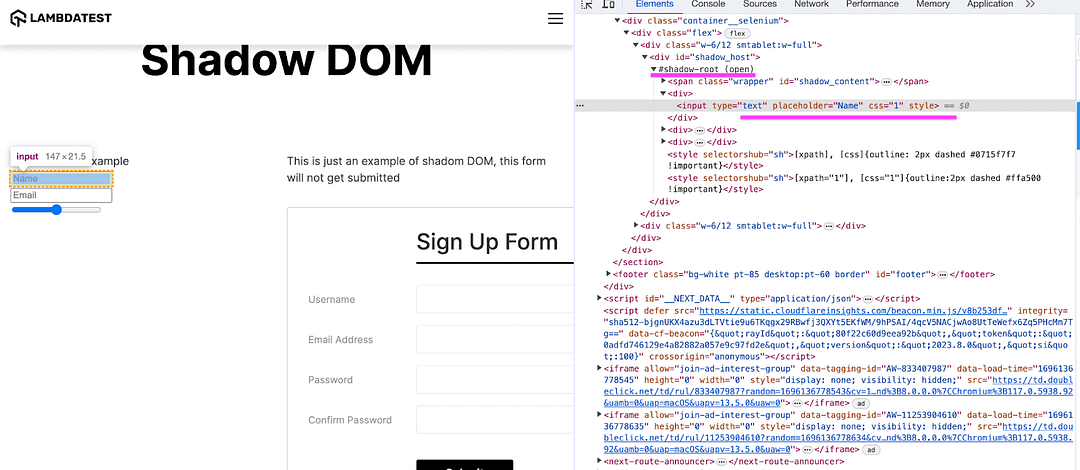
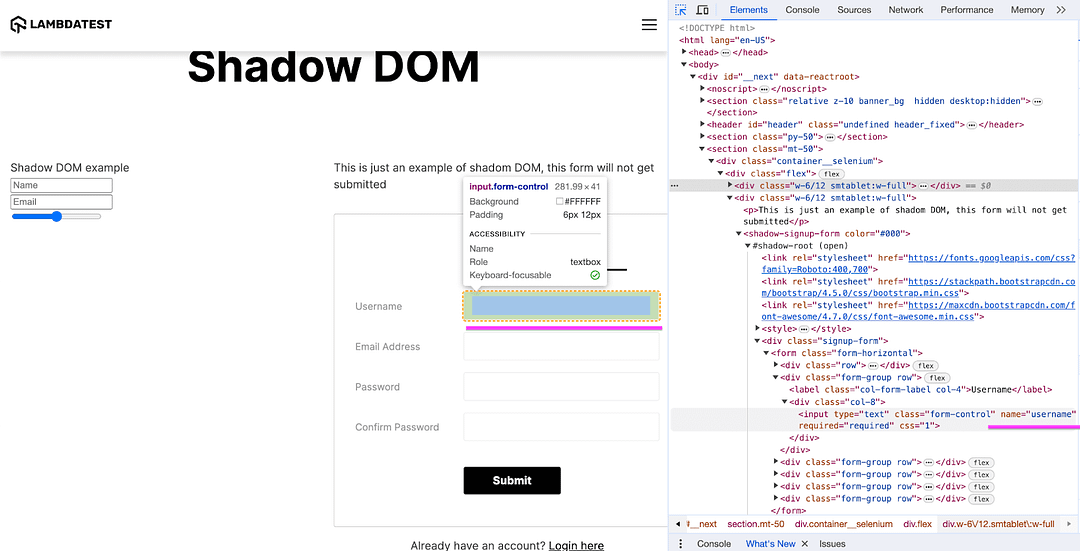
Let’s take an example of the LambdaTest Playground, where we have to enter data in the Name and Email field.
Open the site https://www.lambdatest.com/selenium-playground/shadow-dom.
Enter data in the Name field.
Enter data in the Email field.
Let’s inspect the fields Name and Email. The screenshot below shows the Name and Email fields inside the shadow DOM.
Use our free online Random Number Generator tool to create unique non-repeating random numbers. Input your lower and upper range and get numbers with a click.
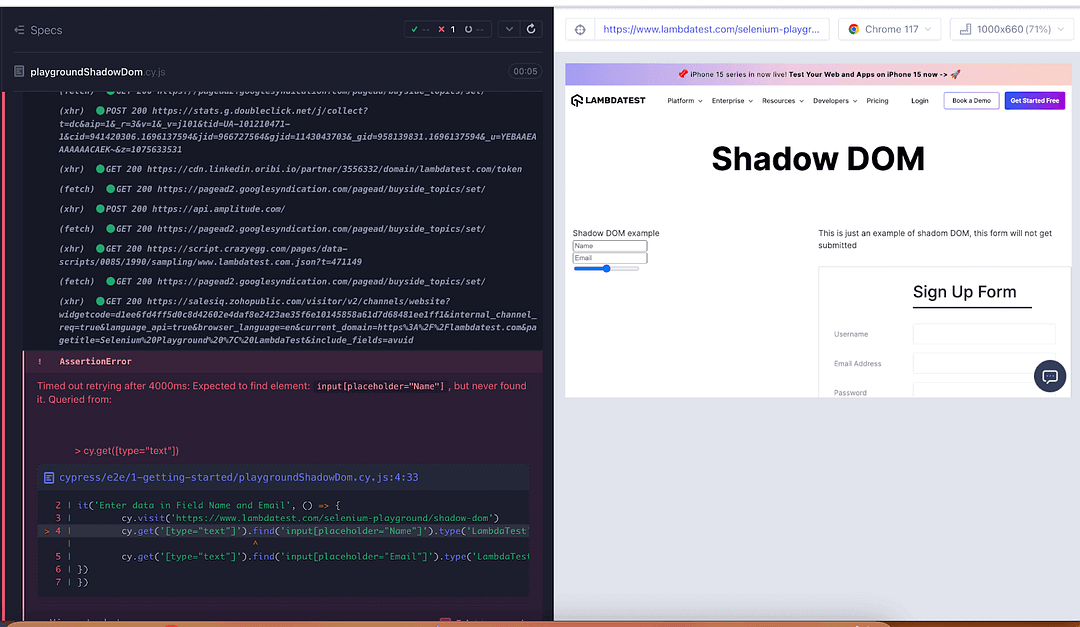
Let’s write Cypress code to enter data in the Name and Email text field and execute the code locally.
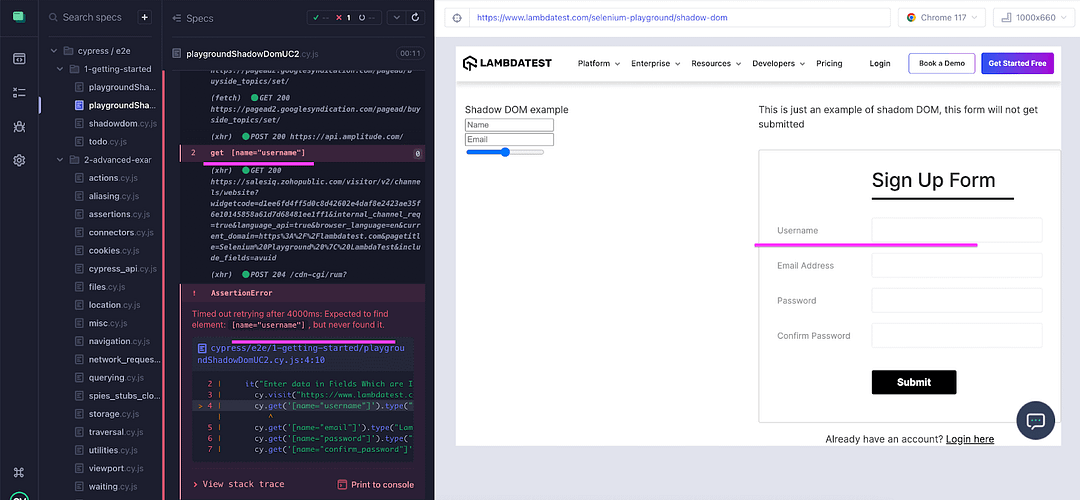
it('Enter data in Field Name and Email', () => {
cy.visit('https://www.lambdatest.com/selenium-playground/shadow-dom')
cy.get('[type="text"]').find('input[placeholder="Name"]').type('LambdaTest')
cy.get('[type="text"]').find('input[placeholder="Email"]').type('LambdaTest@qa.com'})
})
Upon running the code, the error "Expected to find element: #input, but never found it. Queried from:" appears in the command log below. The error occurs because the fields are within Shadow DOM.
Use Case 2
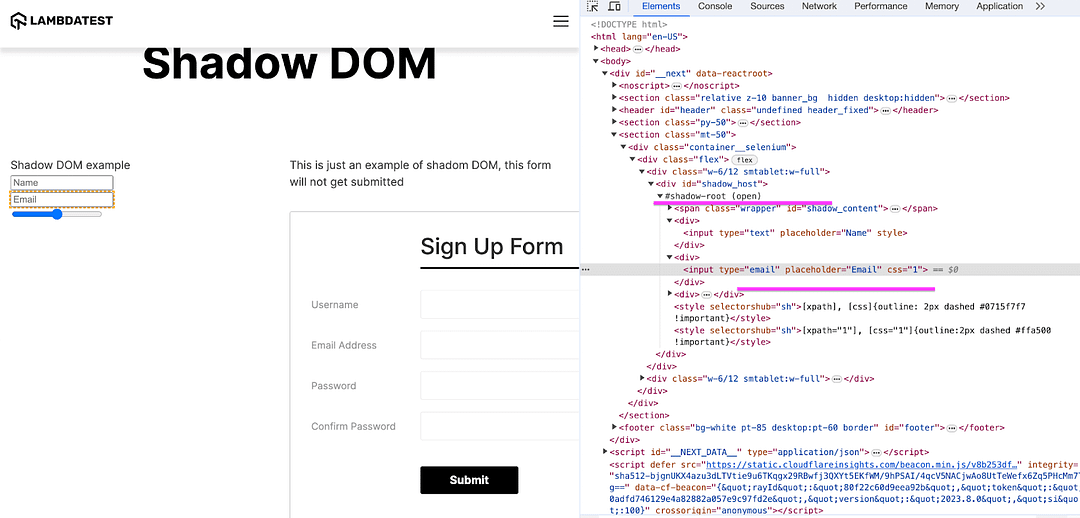
Let’s take another example of the LambdaTest Playground, where we enter data in Sign Up Form fields inside the shadow DOM.
Open the site https://www.lambdatest.com/selenium-playground/shadow-dom.
Enter data in the Username Field.
Enter data in the Email Field.
Enter data in the Password Field.
Enter data in the Confirm Password Field.
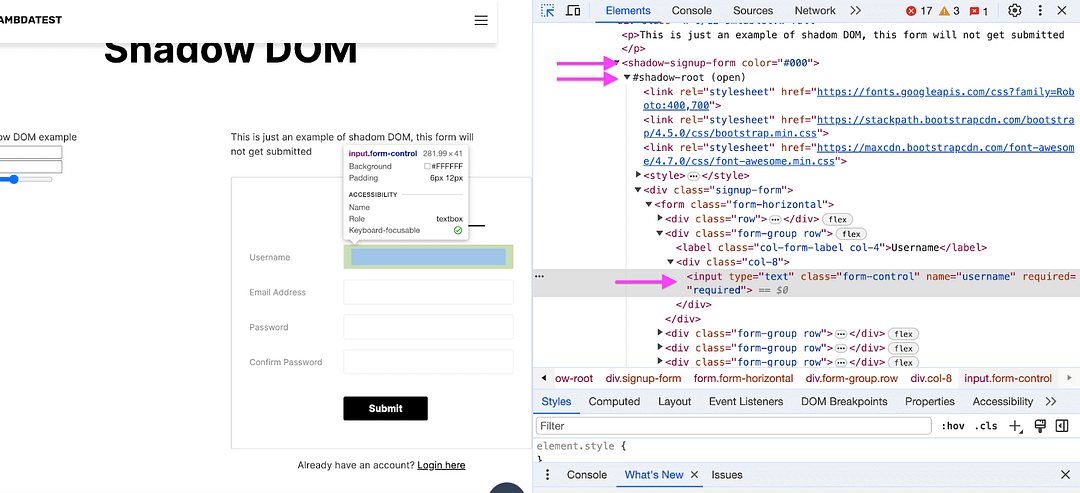
Let’s inspect the field. In the screenshot below, you can see that the Username and other fields are inside the shadow DOM
Let’s write Cypress code to enter data in the Username, Email, Password, and Confirm Password text fields.
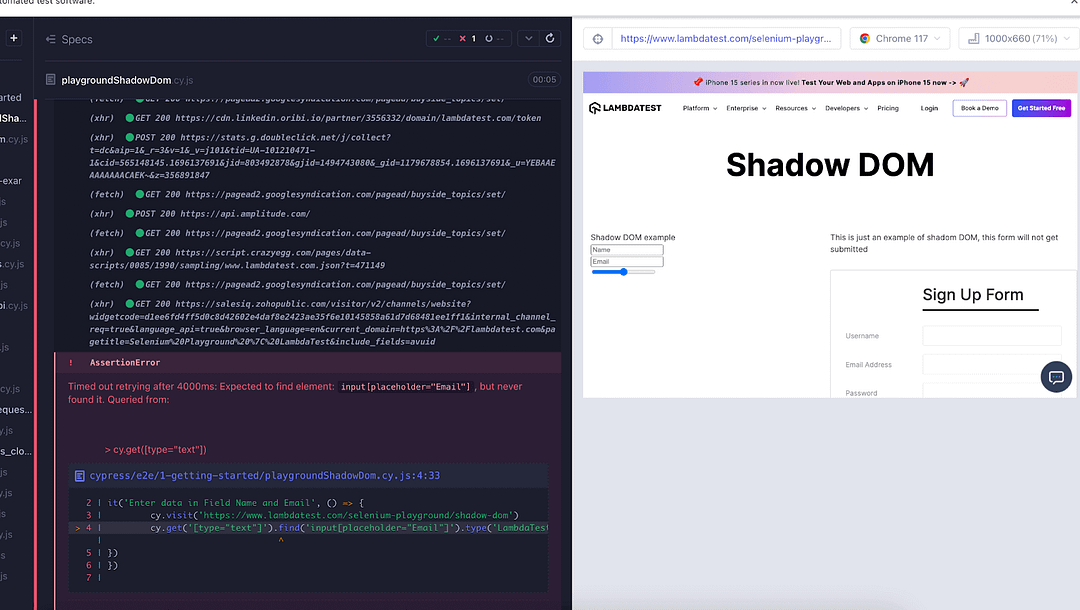
it("Enter data in Fields Which are Inside the Shadow DOM ", () => {
cy.visit("https://www.lambdatest.com/selenium-playground/shadow-dom");
cy.get('[name="username"]').type("LambdaTest", { force: true });
cy.get('[name="email"]').type("LambdaTest@qa.com", { force: true });
cy.get('[name="password"]').type("LambdaTest123", { force: true });
cy.get('[name="confirm_password"]').type("LambdaTest123", { force: true });
});
Let’s run the above code. The screenshot below shows that the error displays Timed out retrying after 4000ms: Expected to find element: [name=”username”], but never found it. The reason is that fields are inside the Shadow DOM.
Before explaining how we can solve the above issue, it’s mandatory to understand the method we can use to access Shadow DOM elements.
Need to encode your text into UTF-8 format? Use our UTF-8 Encode tool to encode your text for seamless communication across all platforms and devices. Try it for free today.
Methods for Handling Shadow DOM
Below is the syntax to access the Shadow element. Let’s see the methods that are used in accessing the element that is inside the Shadow DOM with detail example
Syntax:
.shadow(selector)
.shadow(selector, options)
Example:
Cypress provides a way to traverse into the Shadow DOM of an element for testing purposes. To interact with elements inside the Shadow DOM in Cypress, you can use the .shadow() command.
Assuming you have an element with an ID of ‘my-element’ inside a Shadow DOM:
<my-element>
#shadow-root (open)
<div class="content">Hi LambdaTest Content inside shadow DOM</div>
</my-element>
To traverse into the Shadow DOM and interact with the element with class content, you can use the .shadow() command in your Cypress test.
In this example, cy.get(‘my-element’).shadow() is used to traverse into the Shadow DOM of the my-element and find the element with class content inside the Shadow DOM in Cypress.
// Your Cypress test
it('should interact with an element inside shadow DOM', () => {
// Visit your webpage
cy.visit('http://your-app-url');


// Find the host element with ID "my-element"
cy.get('my-element').shadow().find('.content').should('have.text', 'Hi LambdaTest Content inside shadow DOM');


// Perform interactions or assertions on the element inside the shadow DOM
// For example, click the element inside the shadow DOM
cy.get('my-element').shadow().find('.content').click();
});
In the next section, you will see how we can handle the elements inside Shadow DOM in Cypress using the above-mentioned methods.
Convert your URLs into a secure and easy-to-read format with our URL Encode tool. Make sharing links easier and secured. Simply input your URL and let us do the rest!
Handling Shadow DOM in Cypress
So far, you have seen an issue accessing the elements under the Shadow DOM. In Cypress, there are various methods to access Shadow DOM elements. The upcoming section will elaborate on these methods, providing a comprehensive understanding of how to interact with Shadow DOM elements effectively.
Below, you will see different ways to handle Shadow DOM in Cypress.
Using the .shadow() method
Let’s take the same example and use the shadow() command to enter data in the Name and Email field.
Open the site https://www.lambdatest.com/selenium-playground/shadow-dom.
Enter data in the Username Field.
Enter data in the Email Field.
Enter data in the Password Field.
Enter data in the Confirm Password Field.
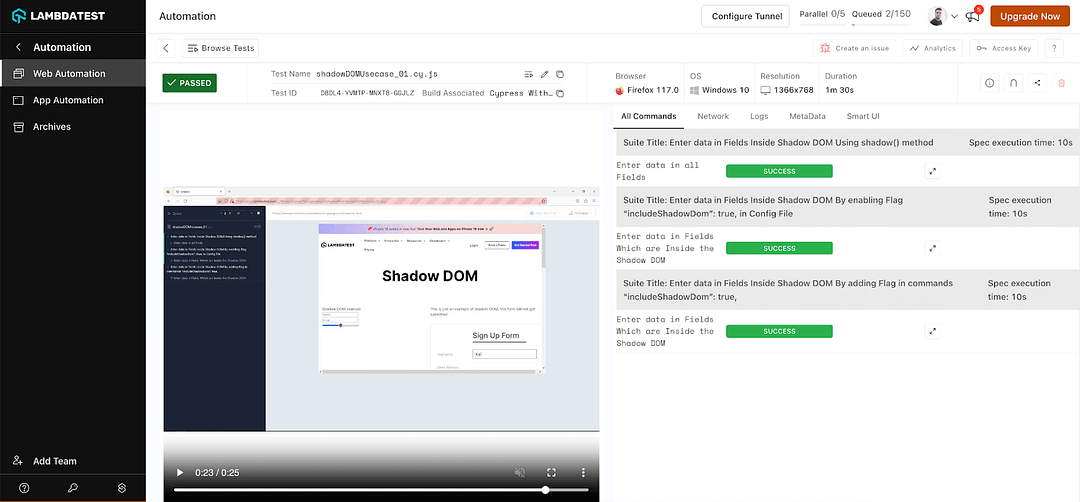
describe("Enter data in Fields Inside Shadow DOM Using shadow() method ", () => {
beforeEach(() => {
cy.visit("https://www.lambdatest.com/selenium-playground/shadow-dom");
});
it("Enter data in all Fields", () => {
cy.get("shadow-signup-form").shadow().find('input[name="username"]').type("Kailash", { for,ce: true });
cy.get("shadow-signup-form").shadow().find('input[name="email"]').type("lambdatest@qa.com", { force: true });
cy.get("shadow-signup-form").shadow().find('input[name="password"]').type("lambdatest@123");
cy.get("shadow-signup-form").shadow().find('input[name="confirm_password"]').type("lambdatest@123");
});
});
Code Walkthrough
Here’s what each part does:
describe(“Enter data in Fields Inside Shadow DOM Using shadow() method”, () => { … });:
This sets up a test suite with a description.
describe(“Enter data in Fields Inside Shadow DOM Using shadow() method “, () =>
beforeEach(() => { … });:
This is a hook that runs before each test case in the suite. In this case, it visits the specified web page before executing every test.
beforeEach(() => {
cy.visit("https://www.lambdatest.com/selenium-playground/shadow-dom");
});
it(“Enter data in all Fields”, () => { … });:
This is an individual test case with the description “Enter data in all Fields”. The test case is responsible for interacting with the elements inside the Shadow DOM and entering data into the specified fields.
it(“Enter data in all Fields”, () => {}
cy.get(“shadow-signup-form”).shadow();:
This line uses the cy.get() command to locate the Shadow DOM element with the tag name “shadow-signup-form”.
cy.get(“shadow-signup-form”).shadow().find();
.shadow().find(‘input[name=”username”]’);:
The .shadow() method is used to interact with elements inside the Shadow DOM, and find(‘input[name=”username”]’) is used to find the input field with the name “username”.
cy.get(“shadow-signup-form”).shadow().find(‘input[name=”username”]’);
.type(“Kailash”, { force: true });:
The .type() command is then used to simulate typing “Kailash” into this input field.
.type(“Kailash”, { force: true });
Similar lines follow for other input fields like Email, Password, and Confirm Password, where data is entered using the .type() command.
To access the input box within the Shadow DOM, we have used the .shadow() method. Once inside the shadow DOM, we can interact with the input box and enter the data in the ‘Username’, ’Email’, ‘Password’, and ‘Confirm Password’ fields.
Keep your data safe and secure by using our free online Base64 Encode. With our tool, you can easily convert any type of data into a secured Base64 string. Try it now!
Adding a Flag in Config File
The second approach handles the Shadow DOM in Cypress by adding the flag ‘includeShadowDom’ in the configuration file.
Add the flag in the ‘cypress.config.js’ file. In the config file, you can add “includeShadowDom“: true.
The includeShadowDom: true configuration option in Cypress enables interaction with elements inside Shadow DOM. When you set includeShadowDom: true in your Cypress configuration, Cypress will enable support for Shadow DOM and allow you to interact with elements inside Shadow DOM using commands like cy.get() and cy.find().
const { defineConfig } = require("cypress");
module.exports = defineConfig({
"includeShadowDom": true,
e2e: {
setupNodeEvents(on, config) {
},
},
});
Let’s write the code. Here, we are not using the .shadow() command.
describe("Enter data in Fields Inside Shadow DOM By enabling Flag “includeShadowDom”: true, ", () => {
beforeEach(() => {
cy.visit("https://www.lambdatest.com/selenium-playground/shadow-dom");
});
it("Enter data in Fields Which are Inside the Shadow DOM ", () => {
cy.visit("https://www.lambdatest.com/selenium-playground/shadow-dom");
cy.get('[name="username"]').type("LambdaTest", { force: true });
cy.get('[name="email"]').eq(0).type("LambdaTest@qa.com", { force: true });
cy.get('[name="password"]').type("LambdaTest123", { force: true });
cy.get('[name="confirm_password"]').type("LambdaTest123", { force: true });
});
});
Adding Flag with Specific Command
The third approach is to handle the Shadow DOM in Cypress by adding the ‘includeShadowDom’ flag within specific commands.
In the third approach, instead of setting the ‘includeShadowDom’ flag globally, a more flexible approach is to include it within specific commands. This allows for finer control, enabling us to specify whether to include Shadow DOM per command.
describe("Enter data in Fields Inside Shadow DOM By adding Flag in commands “includeShadowDom”: true, ", () => {
beforeEach(() => {
cy.visit("https://www.lambdatest.com/selenium-playground/shadow-dom");
});
it("Enter data in Fields Which are Inside the Shadow DOM ", () => {
cy.get("shadow-signup-form").find('input[name="username"]',{ includeShadowDom: true }).type("Kailash", { force: true });
cy.get("shadow-signup-form").find('input[name="email"]',{ includeShadowDom: true }).type("lambdatest@qa.com", { force: true });
cy.get("shadow-signup-form").find('input[name="password"]',{ includeShadowDom: true }).type("lambdatest@123");
cy.get("shadow-signup-form").find('input[name="confirm_password"]',{ includeShadowDom: true }).type("lambdatest@123");
});
});
How to Automate Shadow DOM on Cloud?
Handling Shadow DOM in Cypress on the cloud is crucial for comprehensive and accurate testing of modern web applications. The increasing trend of web applications utilizing Shadow DOM for encapsulating styles and functionality necessitates robust testing mechanisms.
As cloud testing environments like LambdaTest gain prominence, it becomes imperative to validate that the infrastructure supports the intricacies of Shadow DOM testing. This ensures that applications leveraging Shadow DOM can be thoroughly tested in cloud-based environments, guaranteeing the reliability and functionality of the application in real-world scenarios.
LambdaTest is an AI-based test execution and orchestration platform that offers over 3000 real browsers and operating systems to help you automate Shadow DOM in Cypress on the cloud. You can accelerate your Cypress testing with Java and reduce test execution time by multiple folds by running parallel tests on Cypress Cloud across multiple browsers and OS configurations.
Subscribe to the LambdaTest YouTube Channel and stay updated with the latest tutorials around automated testing, Cypress E2E testing, and more.
As we will execute the test cases on the LambdaTest platform, we must configure our tests for the LambdaTest cloud grid.
Test native, hybrid, and web apps on any mobile OS with our free Android emulator online. Sign up to optimize app performance.
Prerequisite:
You already have an account on LambdaTest.
You have an access token to run test cases on LambdaTest.
Configuring Cypress test on LambdaTest
Step 1: Install the CLI
The command-line interface of LambdaTest enables us to execute your Cypress tests on LambdaTest. Use the Cypress CLI command via npm as shown below
npm install -g lambdatest-cypress-cli
Step 2: Generate lambdatest-config.json
Under the root folder, configure the browsers we want to run the tests. Use the init command to generate a sample lambdatest-config.json file or create one from scratch. Use the below command
lambdatest-cypress init
In the generated lambdatest-config.json file, pass the information below. Fill in the required values in the section lambdatest_auth, browsers, and run_settings to run your tests.
In the file below, we pass three browsers (Chrome, Firefox, and Electron) and run the test case in two browsers simultaneously.
{
"lambdatest_auth": {
"username": "Enter username",
"access_key": "enter access key"
},
"browsers": [
{
"browser": "Chrome",
"platform": "Windows 10",
"versions": [
"latest-1"
]
},
{
"browser": "Firefox",
"platform": "Windows 10",
"versions": [
"latest-1"
]
}
],
"run_settings": {
"build_name": "Cypress With Shadow DOM Example ",
"parallels": 2,
"specs": "./cypress/e2e/shadowDom/*.cy.js",
"ignore_files": "",
"feature_file_suppport": false,
"network": true,
"headless": false,
"reporter_config_file": "",
"npm_dependencies": {
"cypress": "13.3.0"
}
},
"tunnel_settings": {
"tunnel": false,
"tunnel_name": null
}
}
Run the below command to execute the test case on the LambdaTest.
lambdatest-cypress run — sync=true
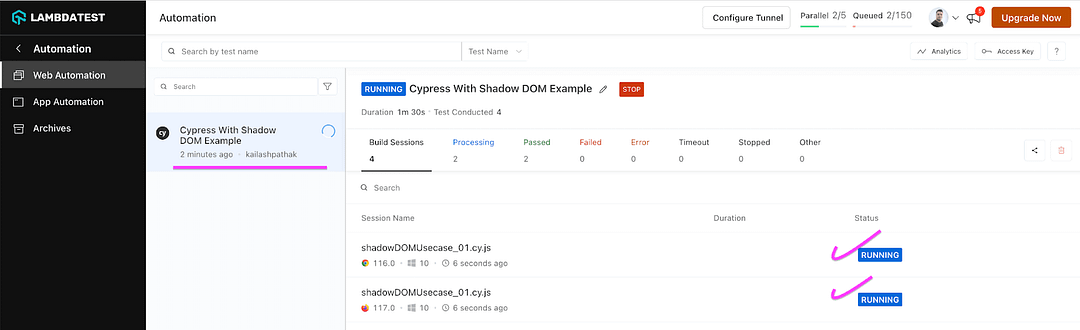
As we run the above command, test execution starts, and test cases are run in parallel on the LambdaTest platform.
seamlessly test your mobile applications, websites,and web apps on mobile browsers and mobile devices Try Mobile Emulator Online.
Test case execution
As we execute the test cases in the screenshot below, both test cases start executing in browsers (Chrome, Firefox) parallelly, and we can see the detailed report in the LambdaTest dashboard.
LambdaTest Dashboard offers users a convenient and intuitive interface to oversee test results, review test outcomes, and utilize various platform features. It enables live interactive testing, offering users a real-time view of the website or web application they are testing on a specific browser and operating system.
The screenshot below shows the test case starts executing in browsers (Chrome, Firefox).
The screenshot below shows that test cases are passed in the browser (Chrome, Firefox).
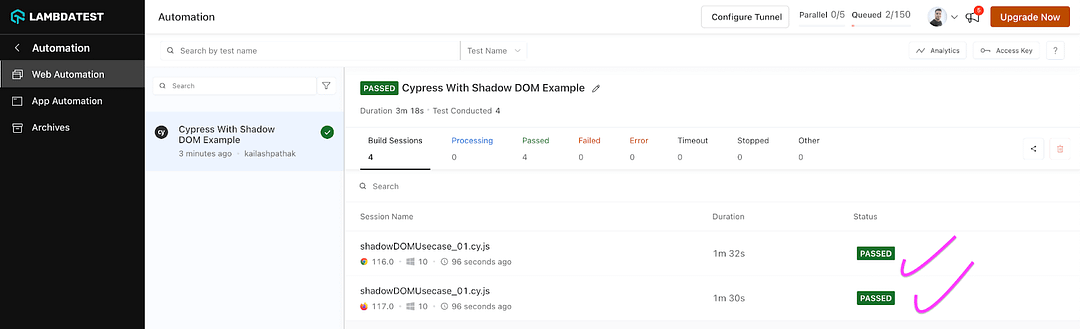
Here is the console log of executed test cases in the Chrome browser. You can see that three of the test cases are passing in LambdaTest Grid.

Here is the console log of executed test cases in the Firefox browser. You can see that three test cases passed on the LambdaTest Grid.
Conclusion
In this Cypress tutorial on handling Shadow DOM in Cypress, we’ve delved into the challenges of handling elements inside Shadow DOM, shedding light on the complexities of interacting with encapsulated components. We’ve explored various approaches and techniques to handle elements within the Shadow DOM effectively using Cypress.
Furthermore, we’ve discussed the integration of LambdaTest, an AI-powered test orchestration and execution platform, and how it enhances the capabilities of Cypress automation. By seamlessly running our Cypress tests across different browser versions and platforms, we ensure our applications’ compatibility and reliability in diverse environments. This integration empowers us to deliver high-quality web experiences to users across the digital landscape.
Perform browser automation testing on the most powerful cloud infrastructure. Leverage LambdaTest automation testing for faster, reliable and scalable experience on cloud.
Frequently Asked Questions (FAQs)
What is shadow DOM used for?
The Shadow DOM (Document Object Model) is a web standard that encapsulates styles, markup, and behavior within a scoped and isolated DOM subtree. It is primarily used to solve issues related to styling and the potential clash of CSS styles and JavaScript code in large and complex web applications. Here are some key purposes and use cases for the Shadow DOM
What is this shadowRoot?
In the context of the Shadow DOM (Document Object Model), shadowRoot is a property of an element that provides access to its own encapsulated subtree. The shadowRoot property refers to the root of the Shadow DOM subtree associated with a specific element.